|
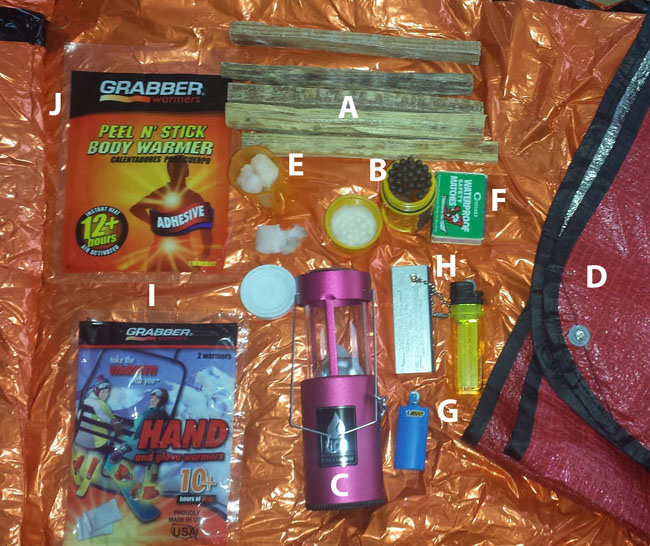
The Anti-Hypothermia Kit, from center top: A: Kindling (Fatwood). B: Hurricane Matches. C: Candle Lantern. D: Heavy Duty Space Blanket (note grommeted corners). E: Fire Lighters F: Waterproof Matches. G: Bic Lighter and Home-made Sparker. H: Magnesium Block with Spark Bar. I: Chemical Hand and Body Warmers. The items are all lying on a SOL reflective bivvy sack (J).
The Kayaker's Bug-Out Bag
The Emergency Items That Should Always Be With You
By David Eden
This article first appeared in ACK May, 2015 - Vol 24 No. 3.
Creek Stewart, survival expert and author, defines "bugging out" as the "decision to abandon your home due to an unexpected emergency situation." Paddlers should never abandon their craft purposefully, but could conceivably become separated and have to go it for some time without a boat or SUP. In these instances, having an emergency kit that would stave off exposure and starvation, and expedite rescue could be a life saver. So I will be describing a two-tiered system, with items that should be attached to you in some fashion, as well as items that can be stashed on deck for instant retrieval, if necessary. But first, some basics.
The first concern of any paddler should be self-rescue, if for some reason you come out of and lose your boat, you want to be dressed for the water temperature, not the air. This can be unpleasant if you are, say paddling in Maine in July, as the air can be quite hot, but the water dangerously cold. I recall an incident with my son, then 12, off Peaks Island in August. He was in a dry suit, with light polypro long underwear and complaining about the heat. He managed to flip in a protected cove on Cushing Island. We were only 25 yards off the beach, so I towed him in. He was shivering by the time we got there, after only five minutes in the water. A quick rub down and a candy bar soon had him right.
So if there had been other endangering circumstances, I would have needed to get him warmed up and kept him that way until help could arrive. This leads us to our first bug-out component:
Anti-Hypothermia Kit
This kit should contain all the materials necessary for an emergency landing, and should be attached to your PFD, so that it never leaves you, along with other necessary items, like your marine radio, cell phone, signal whistle and mirror, signal flasher, flare gun, and munchies. (I must admit that my PFD looks rather like a colorful tactical vest, as if I were storming New Orleans during Mardi Gras, but I am prepared!) If you are out camping, this kit is in addition to any fire-making items you have packed away. Here is what I carry in mine:
A. Emergency energy food
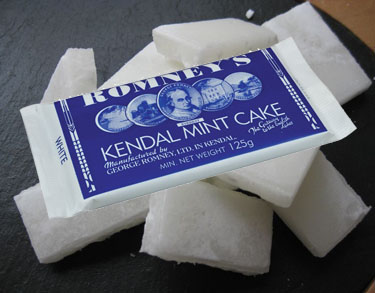
The key to staying warm is to keep the home fires burning, namely, your internal combustion. Some sort of high-energy, low bulk food should be included. I like Kendal Mint Cakes, which are basically glucose and peppermint flavor. The mint cakes have long been a staple on British expeditions, and travelled to the top of Mt. Everest with Sir Edmund Hillary and Tenzing Norgay. Lots of easily digestible calories. (Kendal is not a brand name. It is the town where the mint cakes are made by three companies: Romney's, Quiggin's, and Wilson's. I am only familiar with the last. I don't have a bar in the kit shown - I ate it!)
B. Fire Sparkers/Flame Source
There is a bewildering range of choice in how you can produce a flame. These range from simple matches, through the old-fashioned flint and steel, to the modern versions of the latter, I carry four. The first are hurricane matches (B), which are both wind- and waterproof. I have never used these, as I have never been out in such extreme conditions. They will continue to burn until used up. Regular waterproof matches (F), a Bic or similar disposable lighter, and a home-made sparker (G) complete the starters. Matches need no explanation, but my choice of sparkers might. Although I have a traditional flint and steel kit, and have tried modern versions such as (H) the ones in which you scrape magnesium dust into a little pile and then strike sparks with a special rod and steel, I have never been able to reliably start a fire this way without a fair amount of cussing. It takes a lot of practice to get the sparks to ignite the magnesium, and you have to worry about the dust blowing away or getting wet. Still, the magnesium bar with its integrated sparking edge is light and compact, so it goes into the kit.
The home-made spark producer I created from a used BIC lighter (item "G" in the first photo, directions available on youtube.com) is more reliable for producing sparks. Although a little fiddly to make, it releases a shower of sparks onto my fire starters every time I spin the wheel.

L to R: Using fatwood as a torch around 1555. Kit items double-bagged in zipper-locked freezer bags. The waterproof pack. I include a ten-foot hank of parachute cord in the zippered pocket. The pack is eight by nine by 3½ inches and weighs about two pounds.
C. Kindling and Fire Starters
I have been using fatwood (A) as kindling for years. Fatwood is "derived from the heartwood of pine trees. This resin-impregnated heartwood becomes hard and rot-resistant." (wikipedia.org/wiki/Fatwood). It has been used as a fire lighter and even for torches for hundreds of years. It burns even when wet. I buy a 40-pound box every couple of years, so I always have some fresh to use as kindling, both in my Anti-hypothermia Kit and in my regular fire kit. I usually split a single stick to make a tipi as a basis for any fire, then add whatever kindling is available, shaved down to dry wood if necessary with my handy, attached the PFD survival knife.
The fire starters in the medicine bottle (E) are commercial, but making your own is very easy. The idea is to mix a fibrous material with a flammable agent. Cotton balls or pads, or even dryer lint are good choices for the fiber, and you can use either petroleum jelly, shortening, or even lard as the agent (although the last two might go rancid). I tested all three, and found that I could start a burn with my sparker on each. Really goop up a wad of fiber with the agent, roll into a tight ball, and stick into your storage container. I carry ten or 12 balls.
When you are ready to use the starter, just spread some of the fibers out, then add sparks or a flame. It will burn fairly quickly, but it will definitely get your fatwood blazing.
D. Emergency Heat Source
Even before you get your fire started, you might need to act to get your outer body warming up. The candle lantern (C), which can act as light if you are stranded overnight, can actually help you warm up. The idea is to light the candle lantern, then squat or sit with it under the space blanket. If you are under the blanket, you won't lose heat from your head and you can keep an eye on the candle lantern so you don't knock it over and set yourself on fire. You can also alter your space blanket to use as a poncho, so you can walk around in it. There are excellent directions how to do this at: watertribe.com/Magazine/Y2002/M12/SteveIsaacModifySpaceBlanket.aspx
Another item it might be a good idea to include in your kit is a chemical heat pack (I). There are two main types, the reuseable and the disposable. The former heats very quickly but doesn't last all that long, while the latter, which requires exposure to air, heats more slowly but can last for hours. I have two handwarmers and a body warmer in my kit. I have used the former many times in the winter, and they put out a fair amount of heat.
C. Space Blanket
I carry two types of space blanket in my kit. Space blankets are basically vaporized aluminum deposited on a film to create a reflective and flexible material. They work by redirecting the infrared energy which a living body is always giving off back. (This can make the body less visible to infrared detectors. The Taliban has known this and been using it for years.) The blankets are especially effective if you are damp or wet in chilly conditions. However, they do not vent, so eventually the cooling effect of condensation could be a problem.
My first type (D) is a heavy-duty version with grommeted, reinforced corners. This works well as a space blanket, but can also be tied or staked down in a number of ways as a small tent or a reflector for a fire: You set up the blanket as a lean-to, then sit between it and the fire to keep your back warm, as well.
The second type (J) is the background of the photo. It is a bivvy sack that you crawl into like a sleeping bag for all-around warmth. Remember the caveat about condensation, however. Its orange color makes it visible to potential rescuers.
A useful addition to the Anti-hypothermia Kit would be some sort of super-compressed, super-absorbent towelling. You could get as dry as possible using this, after you have created a heat source and gotten out of immediate danger.
The kit travels on my foredeck, velcroed lightly and under the bungees. If I were out in anything serious enough to make me worried about possibly separating from my boat, I can strap it to the back of my PFD.
2. The Rest of the Bug-out Bag
If you are already on a camping trip, you should have most of the items necessary for survival under unforeseen circumstances for at least 72 hours. You should be able to survive without food and with a minimum of gear for that long if you are dry and warm and will remain so (no rain or snow on the way), but carrying the bug-out bag or extra supplies will make the waiting time much more comfortable. So consider the necessities and the extras when you plan your own supply list.
A classic survivalists bug-out bag should contain pretty much everything you need to survive in relative comfort and safety for up to three days, including weapons. I do not carry one, although the late Robb White, author of How To Build A Tin Canoe (haven't read it? Shame on you!) had a rusty old pistol in with his fishing gear which he used to bring down a huge cobio he had on the end of a four-pound test fishing line, so it might be an idea.
I pack my full bug-out bag if I anticipate the possibility of being stranded on a relatively out-of-the-way shoreline for at least overnight, due to weather or injuries. The requirements for survival include warmth/dryness, first aid, shelter, hydration, and food. Extras would include tools, lighting, hygiene, and communications.
A. Warmth/Dryness
Your anti-hypothermia kit will have the materials you need to create a fire, but there are some more items that you should be carrying along. I carry a dry bag with two sets of long underwear (wool and mixed man-made), two pairs of wool socks, wool gloves a wool hat, and a light-weight poncho. This may sound like overkill, but even in the summer temperatures can go low enough to be dangerous. The poncho, besides its obvious role as rain gear, can also make a reasonable shelter, help collect rain water, and even act as an emergency sail. The underwear can be mixed and matched depending on level of discomfort.
I also have a lightweight summer sleeping bag and 3/4 pad for added comfort.
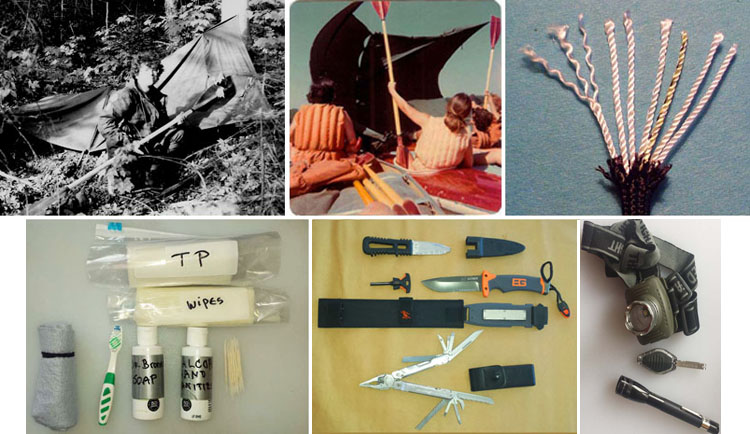
Top L to R: Ponchos as emergency shelter. Two ponchos make a sail for a raft of six boats. It took us 40 miles down the Hudson River. MIL-C-5040 Type III 550 Paracord.
Bottom L: Minimal hygiene supplies for three days. Clockwise from top: Toilet paper, sanitizing wipes, toothpicks, hand sanitizer, Dr. Bronner's Peppermint Soap, cut-down toothbrush, hiker's towel. The peppermint soap doubles as toothpaste. Middle top to bottom: Diver's Knife, Survival Knife, Leatherman. R top to bottom: Headlamp, Photon light, Mini Mag Light.
B. Tools
Although tools are technically an extra, there is one that I carry all the time, strapped to my PFD: a good knife. For years I carried a small diver's knife, a habit I picked up on whitewater. Canoeists often have straps around their knees, and, if they wrap around a rock, they can become entangled in the straps. The knife could turn a potential drowning into a rescue.
For emergencies (and camping), I have replaced the diver's knife with a larger and beefier survival knife. There are a couple of reason for this. First, I have found that the blades on the smaller diver's knives I have used sometimes snapped when being handled roughly (The one shown is my third.)
For camping, and proactively for emergency bugging-out, I prefer a knife to be much more rugged. The knife shown is one of the Ultimate Survival line by Gerber, retailing at about $60. I wanted a knife that was beefy enough to be able to split kindling by batoning, or striking the back of the blade with a stick to drive it through the wood. The sheath includes a magnesium sparker and an integrated coarse sharpening strip.
The only other tool I carry, which is actually many tools in one, is a Leatherman, sort of a Swiss Army knife with needlenose pliers. These come in all sorts of sizes, the one shown, a gift, is a little larger than I would have chosen for myself, but will handle all those repair tasks one is apt to run into from time to time.
Although technically not tools, I also carry several hanks of 550 parachute cord (one 50-foot, three ten-foot, and four five-foot). Parachute cord is even more useful than it would seem at first, as you can break it down into its components. 550 cord is made up of several strands, which can be unravelled to make many more feet of strong cord of various sizes. See a terrific article here about parachute cord.
Finally, I include a small sewing kit with some hefty needles and strong thread, and 15-30 feet of duct tape. Some transport suggestions: If you keep your sewing kit in an old prescription bottle, you can carefully wrap the duct tape around the bottle, which makes a more secure container than the easily breakable plastic boxes small sewing kits usually come in. You can also then include some material patches with the kit. Wrapping spare duct tape around other items in your kits is always a good idea.
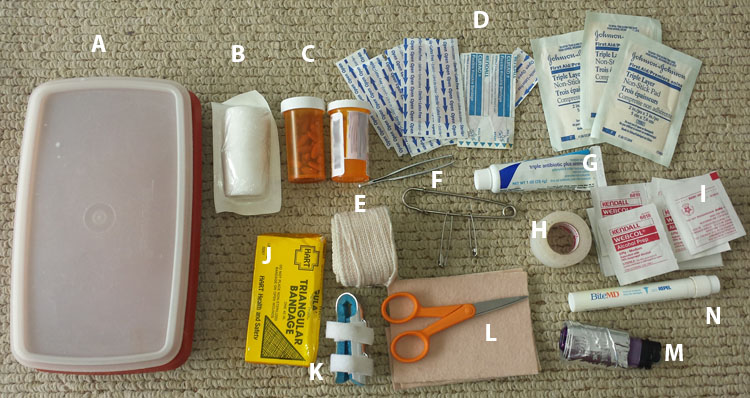
First Aid: A: Container. B: Bandage roll. C: Ibuprofen and three days of prescription meds. D: Selection of band-aids and bandage pads. E: Ace bandage. F: Safety pins and tweezers. G: Triple antibiotic creme. H: Tape. I: Alcohol wipes. J: Triangular bandage. K: Finger splint. L: Moleskin and scissors. M: Lighter with duct tape wrapping. N: Bug-bite stick.
B. First Aid
The makeup of your First Aid kit (of course, you already carry one with you every time you paddle!) depends on three factors: the area you are paddling in, the time you expect to be out, and your degree of paranoia. For many years, while paddling many miles in a day with my young children (you never know when you might have to perform an appendectomy on an off-shore island), I carried a fairly complete one the length and width of a standard laptop. Now I have cut way back on my "always" kit.
C. Shelter
For basic shelter, you should be able to cobble together some form of crawl-under shelter out of the anti-hypothermia kit You can see the picture on the previous page of me on the shores of the Hudson River with my poncho shelter. Very effective if it had rained (it didn't), but no good for bugs. I was completely covered and rather hot overnight, except for my right wrist, which ended up with at least 32 mosquito bites and as big around as a medium sub. If you are stranded, you will probably want something a bit more protective, especially if you are in an area as infested as I was with biting insects. I have a super-light, three-person tent, the Big Agnes Jack Rabbit SL3, which has taken pride of place in my emergency gear bag. (See my review in ACK July/August 2014, Vol. 23, No. 5.) Tight but doable in an emergency for three (warm and very snuggy-buggy), good for two, luxurious for one, and only five pounds packed. To make it even lighter, I can omit the fly and rig one for rain protection using my poncho or space blanket and parachute cord. The tent provides protection from the buggies that infest the areas I tend to paddle in the summer, and the full Monty makes a snug haven for two in an emergency.
D. Hydration
Every paddler with a lick of sense will carry sufficient liquids for the duration of their paddle, so the prepared paddler will carry sufficient for the three-day emergency stay. Camelbak.com has a nice hydration calculator to help you decide how much liquid to carry. The problem arises when you are stuck for longer than you anticipated. This is when you must be prepared to use water sources that may be less palatable than you are used to.
Water is so important to your survival that you may need to increment your supply beyond the carrying capacity of your water bottles. You may need to get water from iffy sources, such as rain pockets in shoreline rocks. If you are lucky and it rains, you can always funnel water using a space blanket, but to use less fresh sources will mean you need to carry some sort of purifying agent. Boiling water is the easiest method, but does require a significant expenditure of time and fuel There are a number of filtering methods available from straws to full-fledged filtering systems for the packer. Your choice should at least guarantee to block the most insidious pathogenic polluters.
There is a difference between filtering and purifying, your kit should be prepared to do both to some degree.
Chemical purifiers like iodine or chlorine are fairly effective in removing pathogens. If you carry tincture of iodine in your first aid kit, you can always use this to purify your water, five to ten drops per 32 fluid ounces (about one liter) of water. Make sure to splash some around the mouth of your bottle. Then wait for at least 30 minutes before drinking. You could also carry a bottle of purifying tablets, which are light and require less worry about titration.
Potable Aqua is a way of putting iodine (tetraglycine hydroperiodide) into the water in pill form. This is not entirely effective in removing dangerous microbes from your water.
A combination of filtration and chemical treatment is recommended to be entirely safe. I haven't had a chance to use my packable filtering system yet, so can't comment on what might be the best to use. We welcome any reader with experience to write up this subject. Pump filters such as the Katadyn Hiker Pro ($80-$85) will clean about a liter per minute. Lifestraw (buylifestraw.com) makes several products for the individual, including filtering water bottles and straws. For more information on purifying water in the field, see the very interesting article at wikipedia.org.
E. Food and Food Preparation
Since we are talking about emergency rations here, you should be mainly concerned about the maximum amount of calories. For pure sugar energy and flavor, it's hard to beat the classic Kendal Mint Cake, long a favorite of British mountaineers and explorers. Basically pure glucose with peppermint flavor. Freeze dried meals are great, but do make deep inroads into your water supply. They also require that you carry some sort of stove and pot, utensils, and the other accoutrements of the portable kitchen. You may want to be able to boil water for some reason, so some sort of pot is not a bad idea.
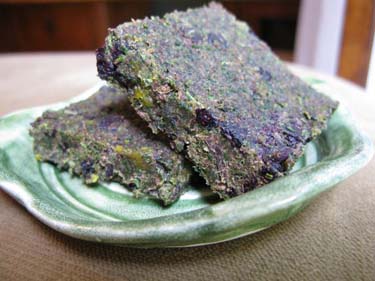
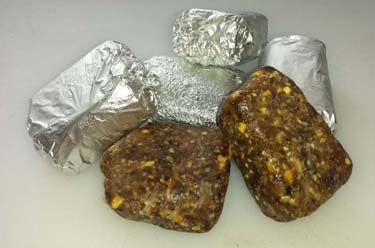
Since we are talking about an emergency stay, I prefer home-made high calorie food bars. I like pemmican and "solo bars," made in advance and stored in the freezer. There are recipes for both pemmican and solo bars at the end of this article. These bars seem to keep in the freezer almost indefinitely, and can be refrozen without affecting their taste. The solo bars pictured on page 30 were made two years ago and are still yummy. I am eating a small piece even as I write!
F. Lighting
It is no fun being caught in the wilds without a light. While I have always encouraged my kids to move without light as much as possible, as using a flashlight will limit your visual awareness at night to the small circle of the flash, a flashlight is useful around camp and for signalling.
My top choice, bar none, for a primary light source is an LED head lamp with an elastic strap. (All your electric light sources should be LED. The bulbs last virtually forever and use much less battery power than incandescent bulbs.) These can range in price from under $10 to nearly $200. I use mine all the time at home, and buy cheap ones at the local drug store. I've never noticed any difference in performance. The elastic strap is what gives out on these, and the more expensive ones don't last any longer.
As back up I carry a few little Photon -style keychain lights clipped in various places and a Mini Maglite. Even the former, light and inexpensive with their single LED bulb, are visible at up to a mile and can be used for night-time signalling.
G. Hygiene
One thing you definitely do not want to neglect when stranded is personal hygiene. At the very least, you should carry toilet paper and hand sanitizer wipes well-protected in zipper-locked bags. I also carry a toothbrush and picks, small bottles of Dr. Bronner's Peppermint Soap and alcohol/aloe hand sanitizer, and a section of very highly absorbent backpacker's towelling. I took a large one and cut it into quarters. The smaller size is adequate if you squeeze the towel out several times, like a chamois for a car.
H. Communication
"The ideal tool for on-water communications is the VHF Marine Radio, since the Coast Guard is on call 24/7 and can triangulate your signal." ("Small Craft Communication," Gordon and Elizabeth Dayton, ACK September, 2013, Vol. 21, No. 5).
That about says it all. You can carry a number of signalling devices, but your primary should be the radio. These are much more affordable than in the past and can be carried attached to your PFD.
My setup is very similar, but I also carry my cell phone in a waterproof pouch, as well as a flare pistol and a brass horn. The horn takes a lot of breath and is not very audible over distances, but I've had it a long time and it's an old friend that has traveled many miles with me.
Your communication devices are not technically part of your bug-out bag, as you should have them with you at all times on the water. The sound signal and night navigation light, at least, are both required by Coast Guard rules.
It should be needless to say that you should be well-versed in the use and capabilities of any communications devices you carry. For a great article about those whistles we all seem to carry, see Wayne Horodowich's "The Whistle in Kayaking" in ACK - April 2015, Vol 24, No. 2.
I. Packing it all up
Now that you have brought all your gear together, you want to put it all into some kind of container and to have it easily accessible if you have to abandon your boat. You don't want to be yanking at a stuck dry bag or struggling with a jammed-down hatch cover. The storage bag obviously has to be waterproof and floatable. The size of your bag and how it is secured in or on your boat depends on how much you have decided to carry along. If you decide to carry your case on deck, before you set out be sure that you can perform any rolls or rescue techniques you will be relying on for safe paddling. Once you have done that, you can head out on your trips well satisfied that you are now prepared for survival.
|


